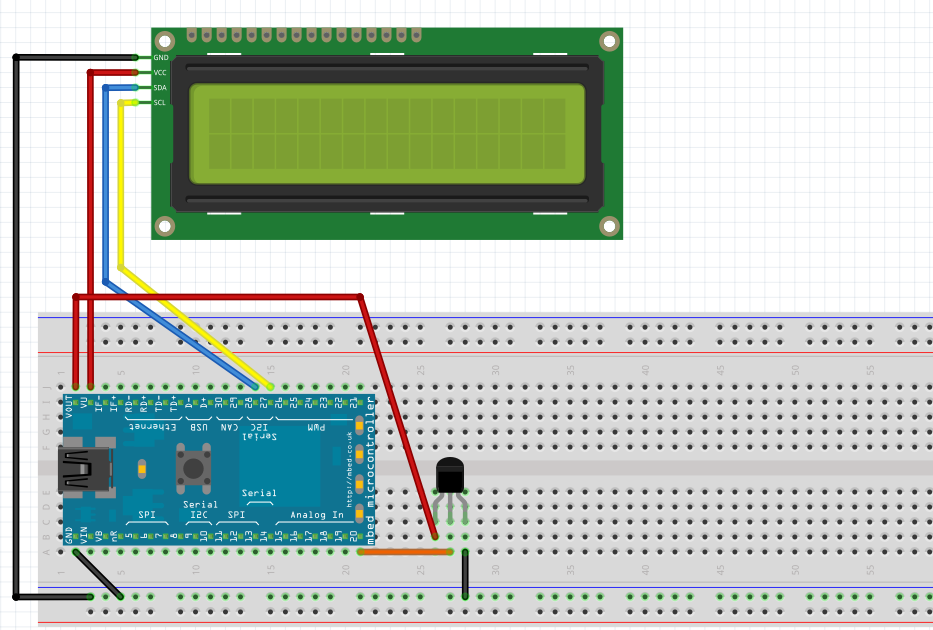
配線します。
- Mbed(LPC1768)をブレッドボードに差します
- 液晶ディスプレイのSDAに28ピンをSCLに27ピンをVCCには5VピンをGNDにはGNDピンを接続します。
- 温度センサー(平な面を前にして)左のピンに3.3Vピン、真ん中のピンに20番ピン、右のピンにアースを配線します

第5回 液晶ディスプレイに温度を表示してみる
配線します。

①プログラムを作成します
 →
→ をクリックします

② プログラム名を入力し、OKボタンをクリックします

③ 左側のマイプログラムのmain.cppをクリックし、コードを以下のように修正します
#include "mbed.h" #include "TextLCD.h" AnalogIn sensor(p20); I2C i2c_lcd(p28,p27); // SDA, SCL TextLCD_I2C lcd(&i2c_lcd, 0x7E, TextLCD::LCD16x2, TextLCD::HD44780); int main() { lcd.setBacklight(TextLCD::LightOn); while(1) { float temp; temp = (sensor * 3.3 - 0.6) / 0.01; lcd.locate(0,0); lcd.printf("%.2f", temp); wait(1.0); } }
④ ドライバのインストールを行うために、mbedのトップページからHardware>Components>Displayを選択

⑤ I2Cと書かれた方のHD44780を選択

⑥ Libraryのimport libraryをクリック

⑦ ②で作成したプロジェクトをTarget Pathに指定し、Importボタンをクリックするとライブラリが取り込まれます

⑧ 取り込んだライブラリのTextLCD_Config.hを以下のように修正します
修正前
//Select Serial Port Expander Hardware module (one option only) #define DEFAULT 1 #define ADAFRUIT 0 #define DFROBOT 0 #define LCM1602 0 #define YWROBOT 0 #define GYLCD 0 #define MJKDZ 0 #define SYDZ 0 #define WIDEHK 0 #define LCDPLUG 0
修正後
//Select Serial Port Expander Hardware module (one option only) #define DEFAULT 0 #define ADAFRUIT 0 #define DFROBOT 0 #define LCM1602 1 #define YWROBOT 0 #define GYLCD 0 #define MJKDZ 0 #define SYDZ 0 #define WIDEHK 0 #define LCDPLUG 0
① 画面左上の![]() をクリックします。
をクリックします。
コンパイルが成功すると、ファイル(display_test_LPC1768.bin)がダウンロードされます
①Windowsメニュー → コンピューター → MBED(F:) をクリックし
この中に先ほどダウンロードしたファイル(display_test_LPC1768.bin)を入れます
② ボタンを押し、LCD上に表示されることを確認します

温度が表示できました!